27 Parts
The Pressbooks writing interface enables you to create multiple sections within your book. In this chapter, you will learn:
- About common parts of a book, and how they work in Pressbooks
- How to organize your book using Parts in Pressbooks
- How to add, delete and rename Parts
1. Common Parts of a Book
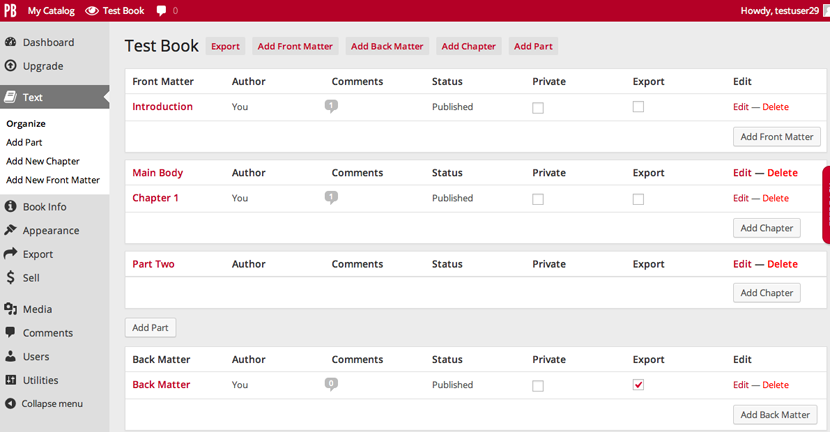
Most books contain at minimum three main parts of a book: Front Matter (things like copyright and preface), Back Matter (things like index and appendices) and the Main Body (the main content of your book, typically made of up chapters, and sometimes parts with chapters).
By default, your book will have these sections set up in the Pressbooks dashboard. Each of these parts of a book is a container to which you may later add as many individual “chapters” as you want. Your book may require different, fewer or more parts than the system default.
Pressbooks allows you to:
- Add new Main Body parts.
- Delete Main Body parts.
- Rename Main Body parts.

To add a new Main Body part:
- Go to Text on the left side of the Dashboard.
- Click on Organize.
- Select the Add Part button (there are three buttons from which you can do this–on the left menu, on the top menu and between the main part of your book and the back matter). Clicking any of these will result in a new Part in the main body of your book.
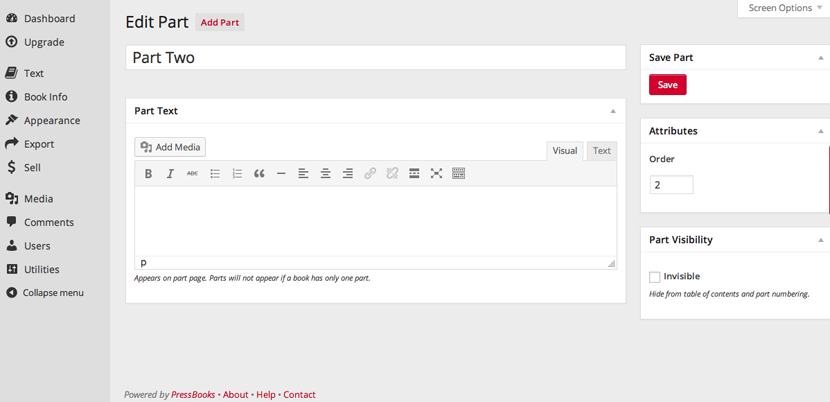
- Enter the name for your part on the next screen. Ex: Part One.
- Add information about this part, if desired.
- Add a number in the box under Order to designate where your part appears (lower numbers appear higher in the book, closer to the front).
- At this stage, you can choose make the book part invisible, meaning you can use it to organize chapters behind the scenes, but it will not be noted in your book’s Table of Contents.
- Click Save.

To delete a part: NOTE: You cannot delete the front matter or back matter parts of your book, but you can add or delete chapters within these parts, make these parts private or published and choose whether to include them in exports (more on this in Chapters). You can delete Main Body Parts. To do so:
- Click the red Delete button that aligns with the name of the part (Main Body, for example).
- Click OK on the popup that appears.
To rename a part:
- Click on the red Edit button that aligns with the name of the part.
- Edit the title on the page that follows.
- Save.
You can check that your change is reflected by returning to the Organize Text screen from the dashboard.
For a visual intro to parts and chapters, check out our tutorial video.

